Adventures in overclocking a Raspberry Pi
A little background
For the past couple of months I’ve been running a Raspberry Pi as my primary NAS at home. It wasn’t something that I had planned. On the contrary, it all started by chance when I received a Raspberry Pi as a conference gift at last year’s Leetspeak. But why using it as a NAS when there are much better products on the market, you might ask. Well, because I happen to have a small network closet at home and the Pi is a pretty good fit for a device that’s capable of acting like a NAS while at the same time taking very little space.

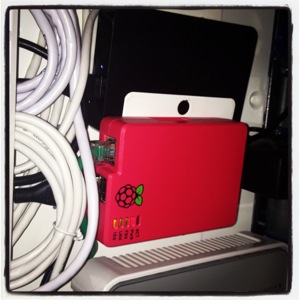
Much like the size, the setup itself also strikes with its simplicity: I plugged in an external 1 TB WD Element USB drive that I had lying around (the black box sitting above the Pi in the picture on the right), installed Raspbian on a SD memory card and went to town. Once booted, the little Pi exposes the storage space on the local network through 2 channels:
- As a Windows file share on top of the SMB protocol, through Samba
- As an Apple file share on top of the AFP protocol, through Nettalk
On top of that it also runs a headless version of the CrashPlan Linux client to backup the contents of the external drive to the cloud. So, the Pi not only works as a central storage for all my files, but it also manages to fool Mac OS X into thinking that it’s a Time Capsule. Not too bad for a tiny ARM11 700 MHz processor and 256 MB of RAM.
The need for (more) speed
A Raspberry Pi needs 5 volts of electricity to function. On top of that, depending on the number and kind of devices that you connect to it, it’ll draw approximately between 700 and 1400 milliamperes (mA) of current. This gives an average consumption of roughly 5 watts, which makes it ideal to work as an appliance that’s on 24/7. However, as impressive as all of this might be, it’s not all sunshine and rainbows. In fact, as the expectations get higher, the Pi’s limited hardware resources quickly become a frustrating bottleneck.
Luckily for us, the folks at the Raspberry Pi Foundation have made it fairly easy to squeeze more power out of the little piece of silicon by officially allowing overcloking. Now, there are a few different combinations of frequencies that you can use to boost the CPU and GPU in your Raspberry Pi.
The amount of stable overclocking that you’ll be able to achieve, however, depends on a number of physical factors, such as the quality of the soldering on the board and the amount of output that’s supported by the power supply in use. In other words, YMMV.
There are also at least a couple of different ways to go about overclocking a Raspberry Pi. I found that the most suitable one for me is to manually edit the configuration file found at /boot/config.txt. This will not only give you fine-grained control on what parts of the board to overclock, but it will also allow you to change other aspects of the process such as voltage, temperature thresholds and so on.
In my case, I managed to work my way up from the stock 700 MHz to 1 GHz through a number of small incremental steps. Here’s the final configuration I ended up with:
arm_freq=1000
core_freq=500
sdram_freq=500
over_voltage=6
force_turbo=0
One thing to notice is the force_turbo option that’s currently turned off. It’s there because, until September of last year, modifying the CPU frequencies of the Raspberry Pi would set a permanent bit inside the chip that voided the warranty.
However, having recognized the widespread interest in overclocking, the Raspberry Foundation decided to give it their blessing by building a feature into their own version of the Linux kernel called Turbo Mode. This allows the operating system to automatically increase and decrease the speed and voltage of the CPU based on much load is put on the system, thus reducing the impact on the hardware’s lifetime to effectively zero.
Setting the force_turbo option to 1 will cause the CPU to run at its full speed all the time and will apparently also contribute to setting the dreaded warranty bit in some configurations.
Entering Turbo Mode
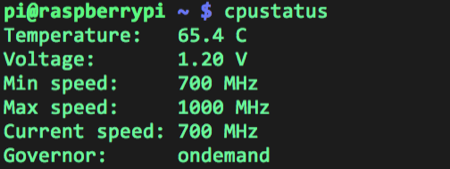
When Turbo Mode is enabled, the CPU speed and voltage will switch between two values, a minimum one and a maximum one, both of which are configurable. When it comes to speed, the default minimum is the stock 700 MHz. The default voltage is 1.20 V. During my overclocking experiments I wanted to keep a close eye on these parameters, so I wrote a simple Bash script that fetches the current state of the CPU from different sources within the system and displays a brief summary. Here’s how it looks like when the system is idle:

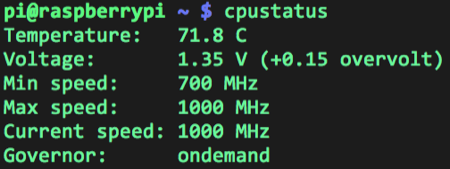
See how the current speed is equal to the minimum one? Now, take a look at how things change on full blast with the Turbo mode kicked in:

As you can see, the CPU is running hot at the maximum speed of 1 GHz fed with 0,15 extra volts.
The last line shows the governor, which is a piece of the Linux kernel driver called cpufreq that’s responsible for adjusting the speed of the processor. The governor is the strategy that regulates exactly when and how much the CPU frequency will be scaled up and down. The one that’s currently in use is called ondemand and it’s the foundation upon which the entire Turbo Mode is built.
It’s interesting to notice that the choice of governor, contrary to what you would expect, isn’t fixed. The cpufreq driver can, in fact, be configured to use a different governor during boot simply by modifying a file on disk. For example, changing from the ondemand governor to the one called powersave would block the CPU speed to its minimum value, effectively disabling Turbo Mode:
cat /sys/devices/system/cpu/cpu0/cpufreq/scaling_governor
# Prints ondemand

echo "powersave" | /sys/devices/system/cpu/cpu0/cpufreq/scaling_governor

cat /sys/devices/system/cpu/cpu0/cpufreq/scaling_governor
# Prints powersave
Here’s a list of available governors as seen in Raspbian:
cat /sys/devices/system/cpu/cpu0/cpufreq/scaling_available_governors
# Prints conservative ondemand userspace powersave performance
If you’re interested in seeing how they work, I encourage you to check out the cpufreq source code on GitHub. It’s very well written.
Fine tuning
I’ve managed to get a pretty decent performance boost out of my Raspberry Pi just by applying the settings shown above. However, there are still a couple of nods left to tweak before we can settle.
The ondemand governor used in the Raspberry Pi will increase the CPU speed to the maximum configured value whenever it finds it to be busy more than 95% of the time. That sounds fair enough for most cases, but if you’d like that extra speed bump even when the system is performing somewhat lighter tasks, you’ll have to lower the load threshold. This is also easily done by writing an integer value to a file:
60 > /sys/devices/system/cpu/cpufreq/ondemand/up_threshold
Here we’re saying that we’d like to have the Turbo Mode kick in when the CPU is busy at least 60% of the time. That is enough to make the Pi feel a little snappier during general use.
Wrap up
I have to say that I’ve been positively surprised by the capabilities of the Raspberry Pi. Its exceptional form factor and low power consumption makes it ideal to work as a NAS in very restricted spaces, like my network closet. Add to that the flexibility that comes from running Linux and the possibilities become truly endless. In fact, the more stuff I add to my Raspberry Pi, the more I’d like it to do. What’s next, a Node.js server?
Enrico Campidoglio
Hi, I'm Enrico Campidoglio. I'm a freelance programmer, trainer and mentor focusing on helping teams develop software better. I write this blog because I love sharing stories about the things I know. You can read more about me here, if you like.
