Git Tips and Tricks
Git is more than just a tool—it’s a Swiss Army knife packed with hidden gems! In my new Git Tips and Tricks course at Pluralsight, I’ll show you how to unlock Git’s full potential.
In 2016, I released my first Pluralsight course on Git. Since then, Git has evolved—and so have I. That’s why I’m thrilled to introduce my brand-new course Git Tips and Tricks, showcasing the latest features and techniques of modern Git that can supercharge your workflow.
Whether you’re navigating complex histories or correcting mistakes, this course has everything you need to level up your Git game. I’m really proud of how it turned out, and if Git is part of your daily life, I think you’re going to love it!
The Case for Pull Rebase
The standard git pull command doesn’t play well with the Trunk-based development workflow. Fortunately, there’s a somewhat obscure way to make things right.
I’m going to make a bold generalization here and say that most development teams would rather work on a single shared branch.
I’m putting the emphasis on shared because, while there may well be other kinds of branches being worked on at any given time (feature branches and Pull Request branches come to mind) there’s still only one main branch everyone commits to. The other branches are often focused on one specific task, so, naturally, they exist for a limited period of time.1
When I say single shared branch, I also mean a long-running branch, one that spans over the entire lifetime of the project.
 Everyone commits their work on a single shared branch, often called
 Trunk.
This style of collaboration is called Trunk-Based Development or Mainline development and is, in my experience, the most common workflow you see around. That’s no coincidence: it’s also the oldest style of development collaboration known to mankind (dating all the way back to the dawn of version control systems) and one most programmers feel comfortable with. After all, there’s ever only one version of the code to worry about.
As much as I love Git’s beautiful branching model, there’s no denying that sticking with the Mainline development workflow for as long as possible is often the smart thing to do in a project. In fact, that’s what the vast majority of open source projects do.2
Having a single long-running shared branch isn’t the problem here; the default behaviour of the git pull command is. Here’s why.
Anatomy of a Git Pull
If you aren’t familiar with Git’s inner workings, it might come as a surprise to know that git pull isn’t actually a core command per se,3 but rather a combination of two other commands: git fetch and git merge; the former downloads any missing commits from a remote repository, while the latter merges them into your current branch.4
Imagine you have a repository whose history looks like this:
 A simple repo.
Now, let’s say that you make a new commit C on master. Meanwhile, someone else on your team commits D on their own version of master; now, here’s the catch: they manage to push their commit to the project’s central shared repository before you.
 You commit
 C, someone else pushes D.
Unaware of that, you try to push your brand new commit C but are bluntly denied — Git lets you know that B no longer is the latest commit in the remote master branch:
! [rejected] master -> master (non-fast-forward)
error: failed to push some refs to '<remote-url>'
hint: Updates were rejected because the tip of your current branch is behind
hint: its remote counterpart. Integrate the remote changes (e.g.
hint: 'git pull ...') before pushing again.
You shrug and run git pull to get the latest commits. Now, keep in mind that git pull is actually git fetch followed by git merge, so here’s what you end up with:
 The result of a regular pull.
Git fetched the new commit D from the remote repository, updated your local reference to the remote master branch origin/master5 and merged that into your local master, thus creating the merge commit M.
You’re now finally ready to push your beloved commit C, along with commit M.
Merge Clutter
At this point, you might think so what, this is just business as usual, and you’d be right — after all, this is what happens when you invoke the standard pull command without any fancy options.
However, consider the effect this has on your repo over time:
 Cluttered history.
This is how history looks like in a project who uses Git together with the Trunk-based development workflow (which, as we established, is pretty common). You see all those merge commits cluttering the mainline? The only reason they exist is because someone on the team happened to push their commits before someone else.
In other words, when everyone commits to a single shared branch, the standard
git pullcommand is going to clutter your history with a bunch of merge commits, simply due to the asynchronous nature of collaboration.
A merge commit should represent a significative event, namely the point in time in which two different lines of history came together: a topic branch merged into a long-running branch (like a pull request), or a long-running branch merged into another (like a release) just to give you an example. The merge commits created by git pull, on the other hand, don’t represent anything — they are an artificial side-effect.
Pull Rebase
Fortunately, it doesn’t have to be that way. Here’s a different approach.
We said that git pull is actually two separate operations: git fetch followed by git merge. Well, it turns out that if we pass the -r (–rebase) option to git pull, we can replace that git merge with git rebase. I know, a fine example of Git’s syntax at its best, right?
Let’s go back to our previous example right before we did git pull.
Back to square one.
This time, we do git pull -r instead and look at what happens:
 The result of a pull rebase.
Git still fetched commit D but instead of merging origin/master into our local master, it rebased C on top of origin/master, thus giving us a linear history.
Now, if everyone on the team was doing git pull --rebase by default, we wouldn’t have any of those artificial merge commits. That’s a win in my book, but we are not done yet.
Keeping The True Merges
There is one more scenario we need to consider: what if you have a local merge commit that you do want to push to the remote — is git pull -r going to keep it?
Unfortunately, the answer is no.
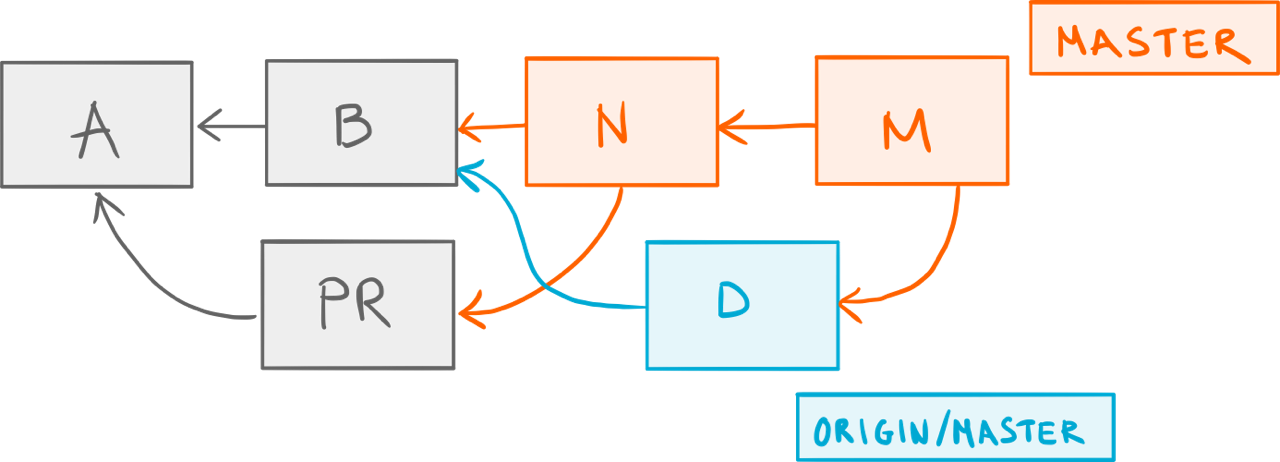
Let’s start once again with our previous example, only this time we have a legitimate merge commit N that we want to share with the world:
 A locally merged pull request branch containing the
 PR commit.
Just for the sake of the argument, let’s see what would happen if we were to run the plain git pull first:
 One merge too many.
Double-merge! 😱 Fortunately, we know better now, so let’s run git pull -r instead:
 Our merge commit
 N is gone after a pull rebase.
Wait — where did N go? The answer is git rebase removed it because, well, that’s what rebase does by default. Luckily for us, there is an option to keep the merge commits during a rebase: the --preserve-merges parameter.6
In the context of git pull, this translates to git pull --rebase=preserve. So, let’s run that instead:
 Rebased merge.
That’s more like it: our merge commit N was rebased on top of the remote origin/master branch.7
The New Default
You’d be forgiven for not remembering to invoke pull with the right combination of arguments at any given time, so let’s make it our new default, shall we? The way you tell Git to always do a pull rebase instead of a pull merge (while still keeping any local merge commits) is by setting the pull.rebase configuration option:
git config --global pull.rebase preserve
git config --global pull.rebase merges   # if you're on Git 2.18 or later
Of course, you can omit the --global option if, for some reason, you only want this to apply to your current repository.
In Conclusion
The combination of using a Trunk-based development workflow with the regular git pull command leads to a history cluttered with merge commits that you don’t want. Fortunately, by simply replacing the merge part of git pull with rebase, you can enjoy a straightforward single-branch workflow without sacrificing the cleanness of your history.
If you're interested in learning other techniques like the one described in this article, you should check out my Pluralsight course Git Tips and Tricks.
-
In Git’s parlance, these are often called topic branches. ↩
-
With a twist: external (and sometimes also internal) contributors can’t commit directly to the main branch, but instead have to submit their code a dedicated Pull Request branch. This workflow has become known as the GitHub Flow. ↩
-
In fact, like many other commands in Git, it used to be a shell script. ↩
-
Where by current, I mean the branch that reflects your working copy. In technical terms, that would be the branch referenced by
HEAD. ↩ -
Git calls them tracking branches but you can think of them as bookmarks that keep track of where a branch is on a remote repository. ↩
-
There’s a interesting story behind the origin of the
--preserve-mergesoption. If you have the time, I suggest you read it. It’s all told inside of a commit message. ↩ -
A short note: the
--preserve-mergesoption has recently been replaced by a more robust implementation in the form of the--rebase-mergesoption. If you’re using Git 2.18 (Q2 2018) or later, you should use that instead by sayinggit pull --rebase=merges. ↩
There Is Cake at Pluralsight
I’m excited to announce that my new Pluralsight course is out — and yes, there will be Cake.1
Not Just Another Make
Kidding aside, I didn’t make a Pluralsight course about baking; it’s about a Make-inspired build tool that uses C# called Cake.

If you’ve never heard of it, let me tell you a story.
When I first came across the Cake project it was the fall of 2014, almost exactly three years ago. Patrik Svensson — a colleague of mine at tretton37 at the time — had been working on it for some time, and had reached a point where things were starting to shape up. So I took a quick look at the code and I remember being impressed by how well it was designed!
As for the tool itself, however, I remained skeptical and here’s why. Back then, the software industry had just gone through a sort of Make renaissance — a period of time during which we saw a large number of build tools, all inspired by the venerable Make, appear on the open source scene.
Each tool was characterized by the particular programming language it would use for its DSL; there was Rake with Ruby, Psake with PowerShell, Fake with F# and Gradle with Groovy, just to name a few. On top of that, you had all the JavaScript ones like Grunt and Gulp. All these tools were part of the Make-renaissance. Frankly, I thought we had seen them all and yet there I was, looking at Cake — the one with the C# DSL. As much as I appreciated Cake’s high standard and thoughtful design, I had trouble justifying its raison d’être.
 Rake, Psake, Fake or Gradle? You must choose, but choose wisely.
To be fair, none of the tools that came from the Make-renaissance was a particularly good fit for a .NET project.2 But that had never stopped me from writing my build scripts. Before Cake, my tool of choice was Psake, for no reason other than that PowerShell is so well integrated with the Windows ecosystem.3 Believe me, when you’re automating any sort of deployment process, integration is what you’re after.
Psake was good in that sense, but it was never great. You still had to manually make sure that every tool you invoked from your build script was present on the target machine (things like compilers, test runners and package managers). On top of that, you had the PowerShell syntax which — let’s face it — isn’t particularly fun to read and much less to write.
One day, I decided it was time to check on Cake to see how it was doing. And let me tell you, it was doing really well; the core team had expanded and the project was thriving with frequent releases and a growing community. Although I found the C#-based DSL to be absolutely delightful, it wasn’t until I saw this that I got really excited:
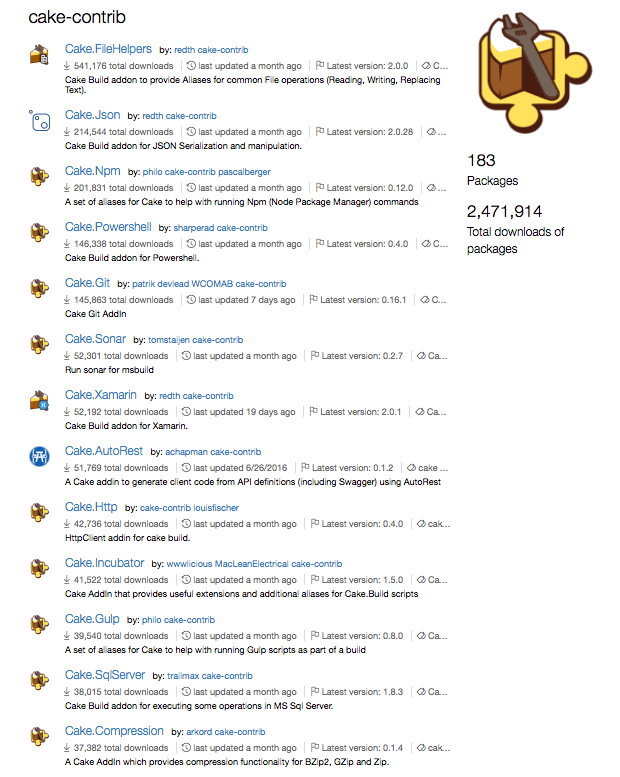 These are only few of the many Cake addins available on the NuGet Gallery.
See that list? Those are only a fraction of the third-party tools and libraries that you can interact with directly from a Cake script — as if they were part of the DSL itself!
How Cake Works
Let me give you a quick example. If you wanted to run all the tests in your project as part of your build process, you could do that with Cake by saying:
Task("Run-Tests")
    .Does(() =>
{
    NUnit3("src/**/bin/Release/*Tests.dll");
});
Here, NUnit3 is an alias — a C# method that’s part of the Cake DSL.4 When you invoke it, Cake will automatically resolve the path to the NUnit 3 console runner’s executable and convert your method call into this:
nunit3-console.exe "./src/UnitTests/bin/Release/MyProject.UnitTests.dll"
See how the "src/**/bin/Release/*Tests.dll" glob pattern was expanded into an actual path to a DLL file? Yeah, Cake did that.
But how do you make sure that the NUnit 3 Console Runner is actually present on the target machine? Easy — you tell Cake to download the NUnit.Console package from the NuGet Gallery before it runs the script by adding a #tool preprocessor directive:
#tool nuget:?package=NUnit.Console&version=3.7.0

Task("Run-Tests")
    .Does(() =>
{
    NUnit3("src/**/bin/Release/*Tests.dll");
});
That’s it. Cake will download any tools and libraries you like as NuGet packages, unpack their contents and store them in a local directory that it manages itself. Oh — and it will also take care of resolving the paths for you.
You see why I’m all fired up about Cake?
![]() The official Cake logo.
The official Cake logo.
Pluralsight
After having used Cake for about a year in all my .NET projects, it occurred to me that not enough people knew about it. So, I drafted a proposal for a Cake course and sent it to my editor at Pluralsight. A couple of emails went back and forth, and soon I was working on Building and Deploying Applications with Cake.
This time I was particularly excited, because that would become the first Cake course to ever appear on Pluralsight. I felt no pressure whatsoever.5
 The very first slide in the course. I still wish the title would fit in one row.
Building and Deploying Applications with Cake
While Cake sports an elegant design fueled by some very smart ideas, there isn’t really that much theory to go through. So, I decided to make a practical course that teaches you how to use Cake in a real-world .NET application.
Also, since Cake is cross-platform, I thought it would be a good idea to demonstrate it both on Windows, using the .NET Framework, as well as on .NET Core running on macOS.
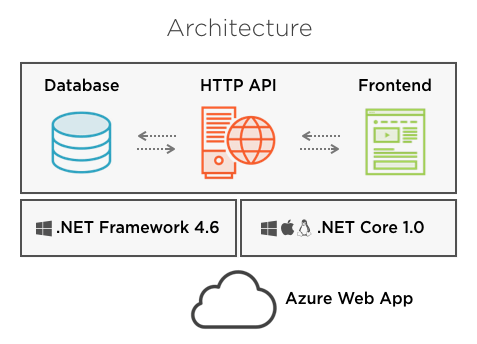 Overview of the demo application used in the course.
The course is about creating a complete build and deployment pipeline for that application — from source code to software running in the cloud — all using Cake. Along the way, you’ll get to know Cake’s features and how to use them to overcome the challenges of automating a build and deploy process, both on .NET and on .NET Core.
Here are some of the topics covered in the course:
- Compiling an ASP.NET web application on Windows and an ASP.NET Core one on macOS.
- Testing with xUnit.net while measuring code coverage.
- Versioning by generating a semantic version number.
- Packaging as a NuGet and Web Deploy package on Windows, and as a Zip archive on macOS.
- Deploying to an Azure Web App using Octopus Deploy, Web Deploy and the Kudu REST API.
- Doing Continuous Integration with TeamCity, Visual Studio Team Services and Travis CI.
My goal was to come up with as many scenarios as possible, throw them at Cake and see if it made my life easier or more difficult. The result? Not only was I able to complete many common tasks (like running the tests or packaging the application) in a matter of minutes, but the final build script came out remarkably short and — most importantly — readable.
Cake is a great build automation tool — especially if you’re a C# developer — and I really think it shows in the course. I’m very happy with how this course turned out, and I hope you’ll enjoy watching it as much as I did baking it. 🙂
-
Just not the kind of cake you’re thinking about. OK, that was a bad Portal joke. ↩
-
With the possible exception of Fake, but — then again — how many .NET developers do you know who feel comfortable writing a build script in F#? My guess is not so many. ↩
-
IIS, Azure, Active Directory and SQL Server — to give you an idea — can all be controlled entirely from PowerShell. ↩
-
Cake comes with many built-in aliases, but you can add even more with external addins. ↩
-
OK, not really. 😬 ↩
 The material published on this blog
by
Enrico Campidoglio
The material published on this blog
by
Enrico Campidoglio
is licensed under a
Creative Commons Attribution 4.0 International License
.
© Enrico Campidoglio AB, 2008–2024 — built with Vim and Jekyll.