Git Undo
Tell me if you recognize this scenario: you’re in the middle of rewriting your local commits when you suddenly realize that you have gone too far and, after one too many rebases, you are left with a history that looks nothing like the way you wanted. No? Well, I certainly do. And when that happens, I wish I could just CTRL+Z my way back to where I started. Of course, it’s never that simple — not even in a GUI.
It was in one of those moments of despair that I finally decided to set out to create my own git undo command. Here’s what I came up with and how I got there.
The Reflog
My story of undoing things in Git starts with the reflog. What’s the reflog, you might ask. Well, I’m here to tell you: every time a branch reference moves1 Git records its previous value in a sort of local journal. This journal is the called the reference log — or reflog for short.
In a repository there is a reflog for each branch as well as a separate one for the HEAD reference.
Getting the list of entries in a branch’s reflog is as easy as saying git reflog followed by the name of the branch:
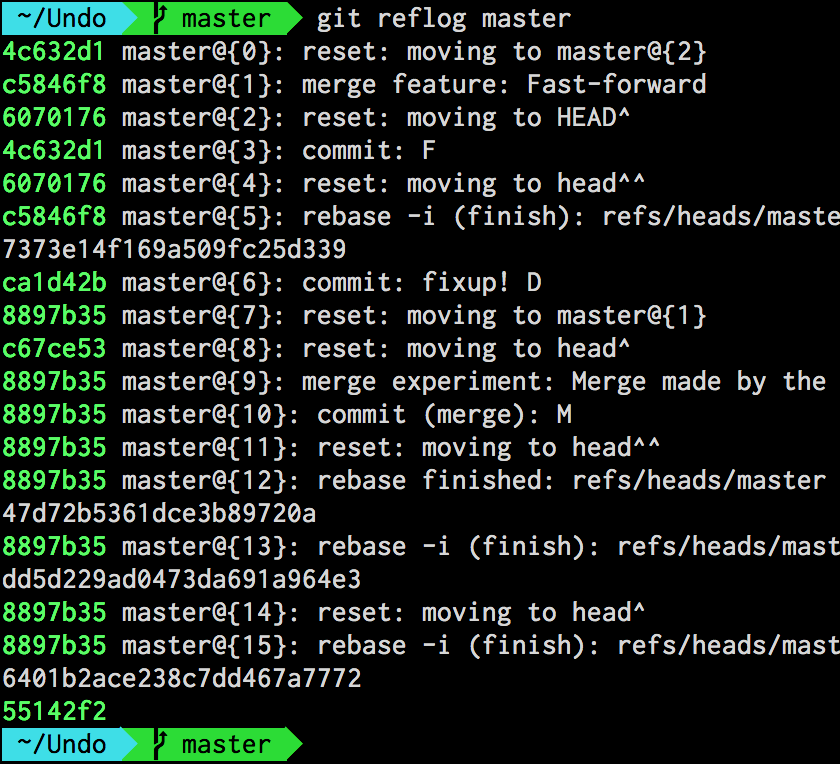
git reflog master
shows the reflog entries for the master branch:
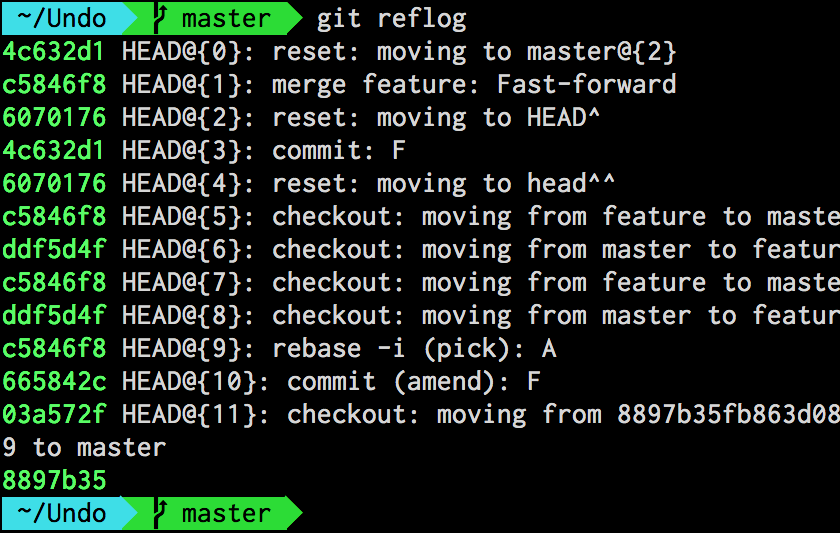
If you instead wanted to look at HEAD’s own reflog, you would simply omit the argument and say:
git reflog
which yields the same output, only for the HEAD reference:
What isn’t immediately obvious is that the entries in the reflog are stored in reverse chronological order with the most recent one on top.
What is obvious, on the other hand, is that each entry has its own index. This turns out to be extremely useful, because we can use that index to directly reference the commit associated to a certain reflog entry. But more on that later. For now, suffice it to say that in order to reference a reflog entry, we have to use the syntax:
reference@{index}
where the two parts separated by the @ sign are:
referencewhich can either be the name of a branch orHEADindexwhich is the entry’s position in the reflog2
For example, let’s say that we wanted to look at the commit HEAD was referencing two positions ago. To do that, we could use the git show command followed by HEAD@{2}:
git show HEAD@{2}
If we, instead, wanted to look at the commit master was referencing just before the latest one we would say:
git show master@{1}
The Undo Alias
Here’s my point: the reflog keeps track of the history of commits referenced by a branch, just like a web browser keeps track of the history of URLs we visit.
This means that the commit referenced by @{1} is always the commit that was referenced just before the current one.
If we were to combine the reflog with the git reset command like this:
git reset --hard master@{1}
we would suddenly have a way to move HEAD, the index and the working directory to the previous commit referenced by a branch. This is essentially the same as pressing the back button in our web browser!
At this point, we have everything we need to implement our own git undo command, which we do in the form of an alias. Here it is:
git config --global alias.undo '!f() { \
    git reset --hard $(git rev-parse --abbrev-ref HEAD)@{${1-1}}; \
}; f'
I realize it’s quite a mouthful so let’s break it down piece by piece:
-
!f() { ... } f
Here, we’re defining the alias as a shell function namedfwhich is then invoked immediately. -
$(git rev-parse --abbrev-ref HEAD)@{...}
We use thegit rev-parsecommand followed by the--abbrev-refoption to get the name of the current branch, which we then concatenate with@{...}to form the reference to a previous position in the reflog (e.g.master@{1}). -
${1-1}
We specify the position in the reflog as the first parameter$1with a default value of1. This is the whole reason why we defined the alias as a shell function: to be able to provide a default value for the parameter using the standard Bash syntax.
The beauty of using an optional parameter like this, is that it allows us to undo any number of operations. At the same time, if we don’t specify anything, it’s going to undo the just latest one.
Trying It Out
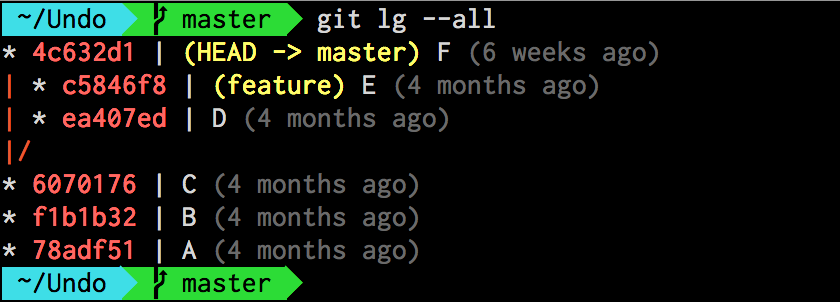
Let’s say that we have a history that looks like this:3
We have two branches — master and feature — that have diverged at commit C. For the sake of our example, let’s also assume that we wanted to remove the latest commit in master — that is commit F — and then merge the feature branch:
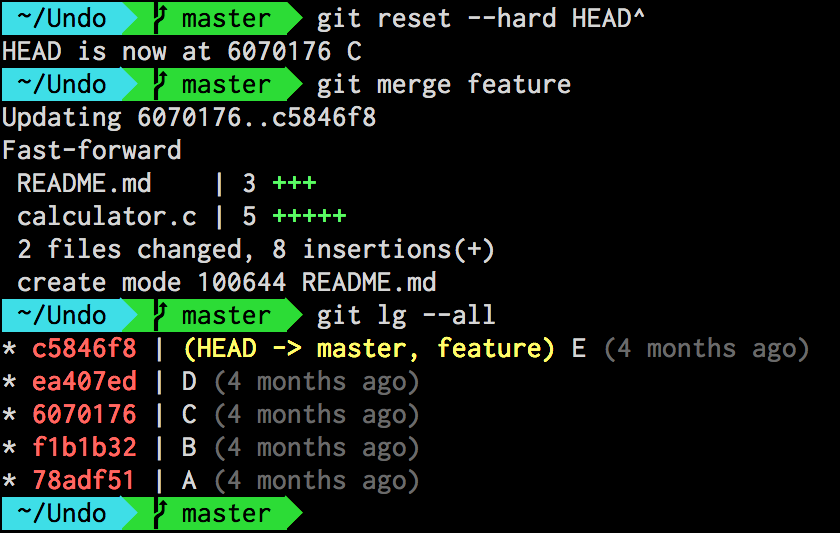
git reset --hard HEAD^
git merge feature
At this point, we would end up with a history looking like this:
As you can see, everything went fine — but we’re still not happy. For some reason, we want to go back to the way history was before. In practice, this means we need to undo our latest two operations: the merge and the reset. Time to whip out that undo alias:
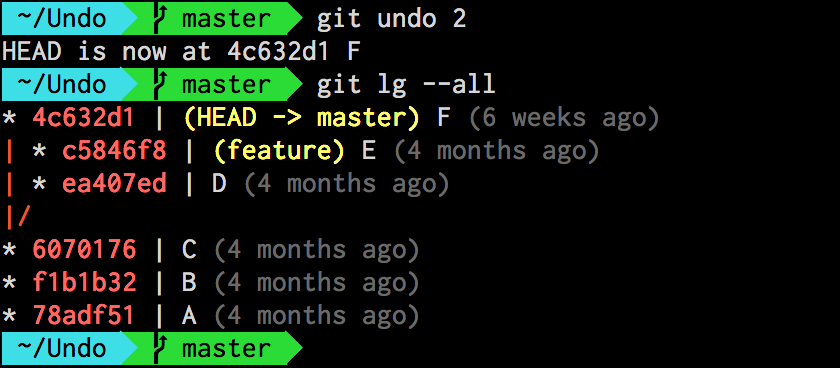
git undo 2
This moves HEAD to the commit referenced by master@{2} — that is the commit the master branch was pointing to 2 reflog entries ago. Let’s go ahead and check our history again:
And everything is back the way it was. \o/
But what if wanted to undo the undo? Easy. Since git undo itself creates an entry in the reflog, it’s enough to say:
git undo
which, without argument, is the equivalent of saying git undo 1.
Did you find this useful? If you're interested in learning other techniques like the one described in this article, I wrote down a few more in my Pluralsight course Git Tips and Tricks.
-
That is, it’s modified to point to a different commit than it did before. ↩
-
You can also use dates here. Try for example
master@{yesterday}orHEAD@{2.days.ago}— pretty amazing, don’t you think? ↩ -
I like my history succinct and colorful. For this reason, I never use the plain
git log; instead, I define an alias calledlgwhere I use the--prettyoption to customize its output. If you want to know more, I wrote about this a while ago when talking about the importance of a good-looking history. ↩
On Being a Good .NET Developer
While reading Rob Ashton’s thought-provoking piece titled “Why you can’t be a good .NET developer” over my morning cappuccino the other day, for the first few paragraphs I found myself nodding in agreement.
Having been a consultant for the past fifteen years, I’ve certainly come across more than a few teams where the “lowest common denominator” was without a doubt the driving force behind every decision. This isn’t in any way unique to .NET, though. I have seen the exact same thing happen in other platforms as well: Java, JavaScript and — to some degree — even C, C++1.
What they all have in common is a humongous active user base.
You see, it’s simply a matter of statistics: the more popular the platform2, the higher the number of beginners. The two variables are directly proportional to each other — some might argue even exponential. If you’re looking for a concrete example, consider the amount of novice JavaScript developers brought in by the popularity of jQuery.
The problem is not that .NET has an unusually high number of “lowest common denominators”. That number is simply higher compared to platforms with a narrower, mostly self-selected, audience.
The problem — and this is where I disagree with the underlying message in that article — is failing a platform based on the number of inexperienced programmers who work with it.
I also don’t think that fleeing is the right way to handle the situation. I don’t know about you, but I like to apply the Boy Scout Rule in more than just code; when I join a team, I want to leave it in better shape than I found it. This means that if I join a team who is dominated by inexperienced programmers, I don’t see it as an excuse to hold back on quality. Quite the opposite, I feel compelled to introduce the team to new ways of doing things, new perspectives. Note that I don’t force anything on anyone; instead, I try to lead by example.
For instance, if I see that the team is stuck using TFS, I will still use Git on my machine and add a bridge like git-tfs to collaborate. Sooner or later, without mistake, someone is going to wonder why I do that. Driven by curiosity, they’ll ask me to explain how Git is better than TFS and I’ll be more than happy to tell them all about it. After a while, that same person — or someone else on the team — is going to start using Git on their own machine and, soon enough, the entire team will be sitting in a console firing Git commands like there’s no tomorrow, wondering why they hadn’t learned it earlier.
I never compromise on excellence. It’s just that with some teams, the way to get there is longer than with others.
To me the solution isn’t to run away from beginners. It’s to inspire and mentor them so that they won’t stay beginners forever and instead go on to do the same for other people. That applies as much to .NET as it does to any other platform or language.
If you aren’t the type of person who has the time or the interest to raise the lowest common denominator, that’s perfectly fine. I do believe you’re better off moving somewhere else where your ambitions aren’t being held back by inexperienced team members. As for myself, I’ll stay behind — teaching.
-
C and C++ have a steep learning curve which forces programmers to move past the beginner stage far more quickly than with other languages in order to get anything done. So, while C and C++ are immensely widespread, the number of novices who work with them tends to stay relatively low. ↩
-
Just to be clear, by “platform” I mean a programming language together with its ecosystem of libraries, frameworks and tools. ↩
The importance of a good-looking history
“Study the past if you would define the future.” ~Confucius
Since the dawn of civilization, common sense has taught us that the way forward starts by knowing how we got here in the first place. While this powerful principle applies to practically all aspects of life, it’s especially true when developing software.
For us programmers, the rear mirror through which we look at the history of a code base before we go on to shape its future is version control. Among all the information captured by a version control tool, the most critical ones are the commit messages.
Git’s view of history
When we’re trying to understand how a piece of software has evolved over time, the first thing we tend to do is look at the trails of messages left by the programmers who came before us. Those sentences hold the key to understanding the choices that molded the software into what it is today.
In other words, what you write in these messages is crucial and you should put extra effort in making them as loud and clear as possible.
This is true regardless of what version control system you happen to be using. However, it is especially true for Git. Why? Because Git simply holds the history of your code to a higher standard.
As Linus Torvalds explained in his excellent Teck Talk at Google back in 2007, Git evolved out of the need to manage the development of the Linux kernel, a humongous open source project with a 20 year history and hundreds of contributors from all around the world.
If source code history has ever played a more critical role in a software project, the Linux kernel is where it’s at.
Torvalds’ attention to history is also reflected in the features he built into his own distributed version control tool. To put it in his own words:
I want clean history, but that really means (a) clean and (b) history.
Regarding the “clean” part, he goes on to elaborate:
Keep your own history readable.
Some people do this by just working things out in their head first, and not making mistakes. But that’s very rare, and for the rest of us, we use “git rebase” etc. while we work on our problems.
Don’t expose your crap.
When it comes to “history”, he says:
People can (and probably should) rebase their private trees (their own work). That’s a cleanup. But never other people’s code. That’s a “destroy history”
You see, Git grants you all the tools you need to go back in time and rewrite your own commits (for example by changing their order, contents and messages) because having a clear history of the code matters. It matters to the sanity of whoever is working on it; present or future.
A legacy of e-mails
Having talked about the importance of keeping your history clean, let’s take the concept one step further.
When you use Git, you should not only pay attention to the contents of your commit messages, but also how they're formatted.
There’s a reason for that. As Torvalds himself stated in his Google talk, for a long period of time the history of the Linux kernel was captured in e-mail threads with patches attached:
“For the first 10 years of kernel maintenance we literally used tarballs and patches.” ~Linus Torvalds
Even in the early days of Git, e-mail was still used as a way to send patches among collaborators of the Linux project.
If you look closely, you’ll notice that the concept of e-mail is pretty pervasive throughout Git. Here’s some evidence off the top of my head:
- Every user has to have an e-mail address which is always part of the commit’s metadata
- The
git format-patchandgit amcommands are specifically designed to convert commits into e-mails with patches as attachments - Both
git blameandgit shortloghave special options to display the committers’ e-mail addresses instead of their names - The
git logcommand has dedicated placeholders to indicate a commit message’s subject and body
The last one is particularly interesting. Git seems to assume that a commit message is divided in two parts:
- A short one-sentence summary
- An optional longer description defined in its own paragraph separated by an empty line
A “well-formed” Git commit message would then look like this:
A short summary, possibly under 50 characters.

A longer description of the change and the reasoning
behind it for the future generations to know.
Even better if it's wrapped at 80 characters so that
it will look good in the console.
If you follow this simple convention, Git will reward you by going out of its way to show you your history in the prettiest way possible. And that’s a good thing.
Formatting matters
Once you fall into the habit of keeping your commit messages under 50 characters and relegate any longer description to a separate paragraph, you can start pretty-printing your history in almost any way you like.
For example, you could choose to only display the commits’ summaries by using the %s placeholder in the --format option of git log:
Or you could go crazy with all kinds of colors and indentation:
The format string I used in this particular example can be broken down as:
"%C(cyan)%s%Creset %C(dim white)(%ar)%Creset%n%w(72,4,4)%b"
where:
%C(cyan)colors the following text in cyan%sshows the commit summary%Cresetrestores the default color for the text%C(dim white)colors the following text in grey%arshows the time of the commit relative to now%nadds a newline character%w(72,4,4)wraps the following text at 72 characters. Then, indents the first line as well as the remaining ones with 4 spaces%bshows the long description of the commit, if any
GitHub itself follows this convention when showing the commit history of a project. In fact, they will only show you the summary of each commit by default. If there’s a longer description available, they allow you to expand it with the press of a button.
 Pretty-printed commit message on GitHub
Enforcing the rule
Of course, this all works best if everyone on the project agrees to follow the convention.
But how do you ensure that the team sticks to the golden rule of pretty commits™?
Well, you give your peers a gentle nudge at exactly the right moment: just when they’re about to make a commit. This is what Jeff Atwood calls the “Just In Time” theory:
You do it by showing them:
- the minimum helpful reminder
- at exactly the right time
GitHub does this already, both on the Web:
 Commit message being validated in the GitHub web UI
and in its desktop clients:
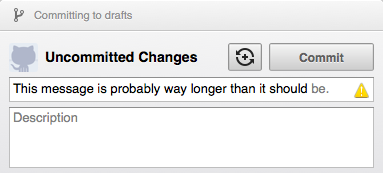 Commit message being validated in GitHub for Mac...
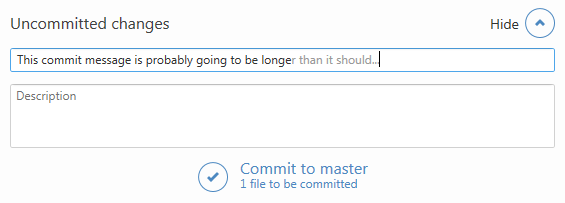 ...and in GitHub for Windows
But what if you prefer to use Git from the command line, the way it should be?
Easy. You write a shell script that gets triggered by Git’s client side hooks every time you’re about to do a commit. In that script, you make sure the message is formatted according to the rules.
Here’s my version of it:
#!/bin/sh
#
# A hook script that checks the length of the commit message.
#
# Called by "git commit" with one argument, the name of the file
# that has the commit message. The hook should exit with non-zero
# status after issuing an appropriate message if it wants to stop the
# commit. The hook is allowed to edit the commit message file.

DEFAULT="\033[0m"
YELLOW="\033[1;33m"

function printWarning {
    message=$1
    printf >&2 "${YELLOW}$message${DEFAULT}\n"
}

function printNewline {
    printf "\n"
}

function captureUserInput {
    # Assigns stdin to the keyboard
    exec < /dev/tty
}

function confirm {
    question=$1
    read -p "$question [y/n]"$'\n' -n 1 -r
}

messageFilePath=$1
message=$(cat $messageFilePath)
firstLine=$(printf "$message" | sed -n 1p)
firstLineLength=$(printf ${#firstLine})

test $firstLineLength -lt 51 || {
    printWarning "Tip: the first line of the commit message shouldn't be longer than 50 characters and yours was $firstLineLength."
    captureUserInput
    confirm "Do you want to modify the message in your editor or just commit it?"

    if [[ $REPLY =~ ^[Yy]$ ]]; then
        $EDITOR $messageFilePath
    fi

    printNewline
    exit 0
}
In order to use it in your local repo, you’ll have to manually copy the script file into the .git\hooks directory and call it commit-msg. Finally, you’ll have grant execute rights to the file in order to make it runnable:
cp commit-msg somerepo/.git/hooks
chmod +x somerepo/.git/hooks/commit-msg
From that point forward, every time you attempt to create a commit that doesn’t follow the rules you’ll get a chance to do the right thing:
If you choose to press y, the commit message will open up in your default text editor from which you can rewrite it properly. Pressing n, on the other hand, will override the rule altogether and commit the message as it is.
Not that you’d ever want to do that.
If you're interested in learning other techniques like the one described in this article, you should check out my Pluralsight course Git Tips and Tricks.
