The Invisible Commits (Part 1)
Your repository has more commits than what meets the eye. They hide somewhere in the .git directory—where you can’t see them—but they’re there. I call them the invisible commits. Knowing where to find them can mean the difference between recovering your work and losing it to the sands of time.
One of the things you’ll often hear enthusiasts like me say is “with Git, you can’t lose your work”. If you wanted to challenge me on that statement, you’d be right—after all, there are no absolutes in computer science.
That’s why I always follow up with an asterisk:
…as long as you’ve committed it.1
If that sounds vague to you, don’t worry—explaining what I mean by that is the very topic of this article.
Resilience by Design
The fact that Git is resilient is no coincidence—it was a deliberate design choice made by Linus Torvalds. Here’s what he wrote in response to a question about data corruption back in 2007:
That was one of the design goals for git (i.e. the “you know you can trust the data” thing relies on very strong protection at all levels, even in the presence of disk/memory/cpu corruption).
“At all levels”—he said—implying that Git has built-in safeguards not only against hardware failure, but also human error.
That’s why experienced Git users will often tell you to calm down in the face of what seems like a disaster. They’re right—in the vast majority of cases you can, in fact, recover commits that you thought were lost. The key—as with many things in Git—is to know where to find them.
 Solid advice in tough situations.
In this article series, I’ll talk about what I like to call the invisible commits; commits that you don’t see, but are there as an insurance policy, just in case you ever need to have them back.
Let’s start with the easy one: the reflog.
The Reflog
I’ve talked about the mighty reflog in more than one occasion. Simply put, the reflog is a journal which records the values of the branch and HEAD references over time. This journal is local to a repository, meaning it can’t be shared by pushing it to remote repositories.
Every time you create a commit, your current branch reference is modified to point to that commit; by the same token, every time you switch to a different branch (for example by using git checkout) the HEAD reference is modified to point to that branch.2
When that happens, the previous and the current value of the reference gets recorded in the reflog belonging to that reference. Go ahead, take a look at a branch’s reflog by saying:
git reflog <branchname>
Or for HEAD:
git reflog
What you get back is something like this:
20da2b6 HEAD@{0}: commit (amend): WIP: reinventing the wheel
176ec0a HEAD@{1}: rebase finished: returning to refs/heads/develop
176ec0a HEAD@{2}: rebase: WIP: reinventing the wheel
2b60b60 HEAD@{3}: rebase: checkout master
2b60b60 HEAD@{4}: cherry-pick: Reticulates the splines
e7db79d HEAD@{5}: checkout: moving from develop to master
93ced10 HEAD@{6}: commit: Does some refactoring
It’s a list where each entry contains a few pieces of information:
- The SHA-1 hash of the commit referenced by the entry.
- The name of the entry itself in the form
reference@{position}. - The name of the operation that caused the reference to change, for example a
commit,checkoutorrebase. - A description associated to the entry; this could be the commit message if it was commit operation or the source and destination branch in case of a checkout.
The reason why this is important in the context of data recovery, is that you can reference reflog entries as you would regular commits.
Recovering Commits from the Reflog
That’s enough theory. Let’s talk about this works in practice. Imagine you have history that looks like this:
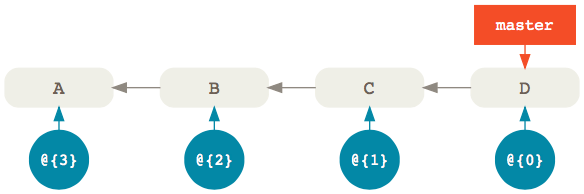
There’s a master branch with four commits. Now, assuming you haven’t modified history in any way, the reflog that belongs to the master branch (shown in blue) is also going to have four entries—one for each commit—with @{0} being the most recent.
Now, let’s imagine that, in the heat of the moment, you accidentally removed the last two commits in your master branch with:
git reset --hard master~2
Now D and E are no longer reachable from master so running git log won’t show them. They’re by all accounts gone, but what if you want to get them back? Where do you find them?
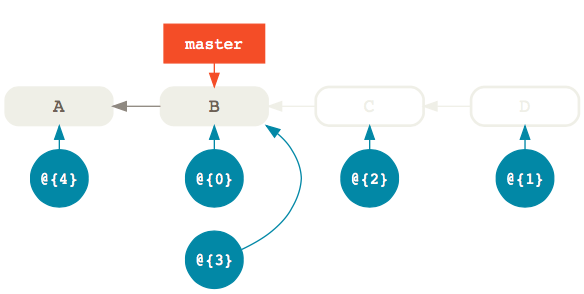
Well, the reflog is still pointing to D and E, you just can’t see it. What used to be entry @{0} became @{1} and a new @{0} entry was created to point to the same commit as master, that is B. Of course, all other entries also shifted by one.
So, if you want to restore the master branch to the same commit it referenced before you modified it, you can simply reset it to the previous reflog entry @{1} which still points to commit D:
git reset --hard @{1}
The important thing to remember is this:
The
@{0}entry in the reflog always points to the same commit as the branch itself. Previous entries follow with increments by one like@{1},@{2},@{3}and so on; in other words, the higher the index, the older the entry.
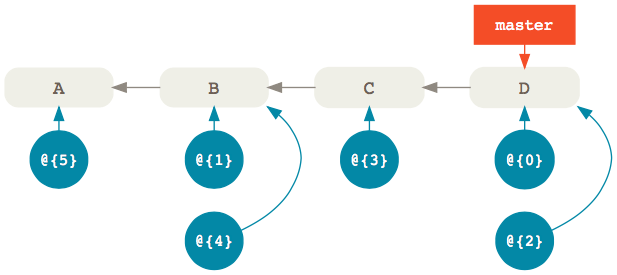
Of course, you can also use the reflog to recover commits that happened way earlier.
For example, let’s say that you want to restore an older commit after you have added a whole bunch of new commits on top of master. Of course, you can’t use git reset because that would remove the new commits.
What you do in that case is apply the older commit on top of master with git cherry-pick:
git cherry-pick @{90}
And voilà—the commit referenced by the reflog entry with index 90 is back in your master branch.3
Searching the Reflog
The last example implies that you can find the commit you’re looking for by simply scrolling through the reflog. Of course, that’s not always the case.
So, what do you do when you want to recover an invisible commit from the reflog, but you don’t know where it is?
The answer is, you search for it using git log. Here’s an example:
git log --grep="Some commit message" --walk-reflogs --oneline
Let’s unpack this command:
--grepallows you to find commits whose message matches a pattern (which can be a regular expression).--walk-reflogstells thelogcommand to search through the commits referenced by the reflog instead of the ones referenced by a particular branch.--onelineprints out the commit SHA-1, the reflog reference and the commit message in a single line for a more compact output (if you like it, of course).
That’s the kind of search I usually do, but it’s certainly not the only one.
For example, you can also look for commits that happened within a specific time range:
git log --walk-reflogs --since="2 days ago" --before="yesterday" --oneline
Here, we’re specifying the times with the natural formats supported by Linus Torvalds’ amazing approxidate implementation.4
While we’re talking about dates, note that you can also use times instead of indexes when referencing a specific reflog entry. For instance, you can limit your search to just the entries from a particular point in time:
git log --walk-reflogs --oneline master@{"2 days ago"}
This will print out the timestamps when the reflog entry were created instead of their index, which sometimes is more helpful:
20da2b6 master@{Mon Oct 16 11:20:58 2017 +0200}: commit (amend): WIP: reinventing the wheel
176ec0a master@{Mon Oct 16 10:37:51 2017 +0200}: rebase finished: returning to refs/heads/develop
176ec0a master@{Mon Oct 16 10:37:14 2017 +0200}: rebase: WIP: reinventing the wheel
2b60b60 master@{Mon Oct 16 10:37:8 2017 +0200}: rebase: checkout master
Things You Won’t Find in the Reflog
By now, it should be clear that the reflog should your first destination when you’re looking for commits to restore. However, be aware that things won’t stay there forever.
Reflog entries have, in fact, expiration dates. By default, they’re set to expire after 90 days, but you can change that to any number of days by setting the gc.reflogExpire option:
git config --global gc.reflogExpire 120
After that, the entries are deleted from the reflog. 😱
Note that this setting is only valid for entries whose commits are still reachable from a branch; this means that entries whose commits are unreachable from a branch or a tag have a different expire date; the default value for that is 30 days.
This makes sense if you think about it; unreachable commits are more likely to be junk left behind by various history modifications, and can therefore be cleaned out more often.
However, if you do want to keep them around longer, just in case, you can do so by setting the gc.reflogExpireUnreachable option:
git config --global gc.reflogExpireUnreachable 60
Just because Git removes an entry from the reflog, it doesn’t mean that the commit itself is also gone. In fact, the commit will still be around until the next garbage collection.
So, when the reflog is no longer an option, we have to find another way to retrieve our invisible commits. We’ll see how in the next article.
-
Followed by a second asterisk that says “and less than a certain amount of time has passed”. More on this later. ↩
-
There are also other situations that would cause the
HEADreference to change, like, for example, a rebase. ↩ -
Of course, you can also reference commits from other branches’ reflogs; if the commit you’re looking for was in
develop, for example, you could just saygit cherry-pick develop@{90}to bring it into your current branch. ↩ -
Which, I discovered, has since been extracted into its own library. ↩
The Next Step
Today, I start my new job as a freelance teacher and mentor. It took me a while to get there, but I’m excited to finally start this new chapter in my career.
If you’d like to hear the background story, read on. If, instead, you’re more interested in knowing what’s next, here’s what I have in store.
Background Story
Sharing information has always been a passion of mine. In high-school, I remember taking every opportunity to tell my friends the latest facts about one of my favorite subjects.1 Normally, I would get about five minutes before someone would change the subject, and that was OK. But every once in a while, I managed to capture someone’s attention. I could see it in their eyes that they wanted to know more. I remember thinking how that was a precious moment — a rare opportunity to share with someone something I knew very well — and I had to treat that chance with respect or there would be no others.
Teaching
Fast-forward ten years. I’m in a classroom in front of twenty students. I had just accepted an assignment in a continuing education school in Malmö and those twenty people were waiting for me to teach them Linux. It was frightening but I enjoyed every bit of that experience! By the end of the semester, I knew what I wanted to do.
But teaching wasn’t my main occupation. I was a consultant and my time was spent developing software for my clients. Don’t get me wrong — I loved my job and still do. Occasionally, I would be lucky enough to teach an internal course at a client for a few days, which was grand. But those assignments were few and far between. Nevertheless, I loved teaching and the feedback I got motivated me to hold on to it.
Speaking
In 2011, I started doing talks at conferences and user group meetings. In the beginning, I would only speak at local events in the Malmö and Copenhagen area but, soon enough, I expanded to international conferences around Europe. I had found another outlet for doing what I love, which was great, but it still wasn’t part of my day job. My spare time was all I could give it.
tretton37
In 2012, I found a young but ambitious consulting company that valued knowledge sharing as much as I did: tretton37. I joined them and had the privilege to represent those values at numerous conferences and user group events (including twice at their very own and highly praised Leetspeak). I had a great time! But as with all good things, there was a downside: although speaking was part of my job description, it still only accounted for a small portion of my time. That didn’t bother me too much in the beginning but, as time went on, I wished I could do more.
 Me, speaking at a Foo Café meetup in Malmö sponsored by tretton37 in March 2013.
Pluralsight
A couple of years ago, a dear friend of mine offered me the opportunity to start making online courses for Pluralsight as a side gig. This was right up my alley so, naturally, I jumped at the chance! After a few months, I published my first course on one of my favorite subjects: Git. It was a lot of work (and I mean a lot) but I enjoyed it and wanted to do more. Unfortunately, once again, this wasn’t my main job, so I could only work on it in the evenings and weekends.
That’s when reality finally caught up with me.
Standing at a Crossroads
When you’re following your passion, it’s easy to become laser-focused and forget about the other important aspects of life. I have a wife and two young daughters. It has always been my top priority to be there for them, regardless of my current workload; however, in reality, I sometimes failed to live up to that.
Eventually, I realized that pursuing two careers is unsustainable — willingness be damned. I had to make a choice: I could either keep working as a full-time consultant or I could dedicate myself to what I really love: teaching.
Needless to say, I chose the latter.
I am grateful for my time at tretton37 — they’re a talented group of people with a great culture and I wish them all the best for the future. As for myself, I’m going to pursue my dream of helping others improve the way they develop software by teaching and mentoring.
What’s Next
Basically, I’m going to be working on the same things I did before in my spare time, only now they are my day job.
I’ll continue to make courses for Pluralsight.2 I’ll also be doing on-site training with presentations and workshops.
In addition to that, I’ll be offering a new consulting service that combines education with productivity: I call it teaching by doing. You can read more about that in my services page, if you’re interested.
That’s all for now. If you’ve made it this far, thank you for reading. Exciting times are ahead and I can’t wait to get started.
-
Back then, it would have been either PC hardware, radioactivity, the NBA or all of the above. 😳 ↩
-
In fact, I have a new course coming out in just a few short weeks, so watch out for that. 😊 ↩
What's in a Branch
Graphs and References
Before I tell you all about querying the state of your branches, let’s back up for a second and remind ourselves of how Git views history.
Consider this graph:

What you’re seeing here is a directed acyclic graph: a fancy name used to describe a group of nodes (graph) where the edges point to a certain direction (directed) and never loop back on themselves (acyclic).
Why is it relevant? Because this is how Git represents history.
In Git’s parlance, each node represents a commit and each commit has exactly one edge that connects it to its parent. In other words, the directed acyclic graph of a Git history can only go in one direction: backwards.
So far, so good. Now let’s add one more piece of information to the mix:

See that master label? That’s a branch. Branches are simply references that point to specific commits. In fact, a branch is a 41 bytes text file that contains the ID of the commit it references. Don’t believe me? Try running this command in the root of your repository:1
cat .git/refs/heads/master
You’ll get back something like this:
514e6c9c96d27ab9eb776644c7c3cdadce61979f
That 41 characters string is the SHA-1 hash of the commit object that’s currently referenced by the master branch. Go ahead, verify it with:2
git show 514e6c9
Hopefully, you’ll believe me now. So, let’s boil it all down to a single sentence to make it easier to remember:
In Git, a branch is a reference to the latest commit in a sequence; the history of a branch is reconstructed starting from that latest commit going backwards, following the chain of parents.
Reachability
Now that we have a good mental model for thinking about history, we can talk about the concept of reachability.
Imagine we have a history that looks like this:

Here, we have two branches named master and feature that diverge on commit B. We can immediately observe two things at first glance:
- The
featurebranch contains commitsEandDwhich are not inmaster. - The
masterhas commitCthat’s not infeature.
Sure, it’s easy enough to tell when your history is this small—and you have a pretty graph to look at—but it might not be as obvious once you deal with more than two branches and a large number of commits.3
But don’t despair: everything becomes much clearer once you start thinking in terms of commits and what is reachable from which branch. Let me explain:
A commit A is said to be reachable from another commit B if there exists a contiguous path of commits that lead from B to A.
In other words, A is reachable from B if you can start from B and arrive at A just by following the chain of parents.
Easy, right? Now, combine this concept with the notion that branches are just references to commits and you have all the pieces you need to solve the puzzle!
Reachability is a powerful concept because it allows us to take our initial question:
Which commits are in a branch?
and turn it into:
Which commits are reachable from a branch and not from another?
Git has a way to express this: it’s called the double dot notation. Consider this command:
git log --oneline master..feature
9b571c2 E
fa77581 D
This literally means: show me the commits that are not reachable from the first reference in the range (master) but that are reachable from the second reference (feature). The results is commits E and D:

Observe what happens when we switch places between the two branch references:
git log --oneline feature..master
2eec656 C
That’s right, we get commit C, that is the commit not reachable from feature but reachable from master:

This expression is so useful that I even made an alias for it:
git config --global alias.new "log master..HEAD"
Now, every time I want to know which commits are in my current branch (referenced by HEAD) that I haven’t yet merged into master, I simply say:
git new
What Was Merged?
If your workflow involves a lot of merge commits (like GitFlow), one of the questions that will pop up a lot is:
Which commits were brought into a branch by a specific merge?
To answer that, let’s consider our two sample branches; this time, we’re going to merge feature feature into master:
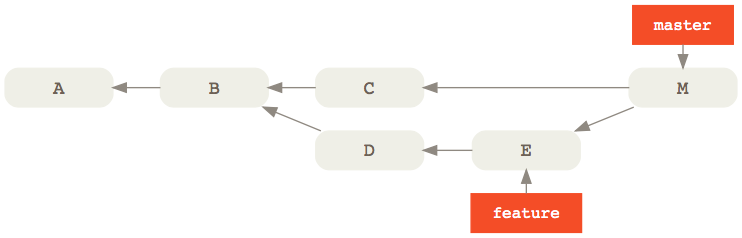
Let’s play a bit of Jeopardy4: if the answer is commits E and D, what’s the Git command? Remember, we don’t have a pretty graph to look at; all we have is the console and the concept of reachability that we talked about before. Give it some thought. Can you guess it?
Let me give you a hint. Another way of phrasing the question we’re looking for is:
Which commits were not reachable from
masterbefore the merge commit but are reachable now?
Considering that the first parent of a merge commit is always the destination branch—that is the branch that was merged to—one way to express that would be:
git log --oneline M^..M
cad1c97 M
9b571c2 E
fa77581 D
This is saying: show me the commits that are not reachable from the first parent of the merge commit M (that is C) but that are reachable from M.
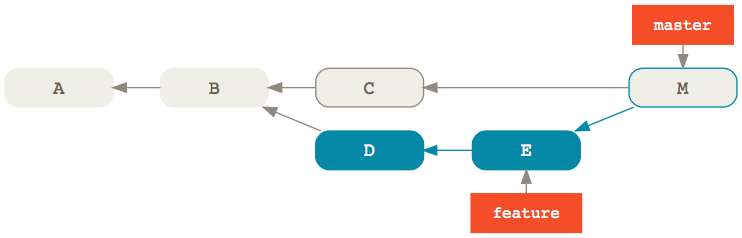
As you would expect, we get back M itself followed by E and D, that is the commits merged into master 🎉
This expression is so common that it even has a shorter—albeit more unreadable—version as of Git 2.11:
git log M^-1
Just when you thought Git commands couldn’t get any more cryptic, right? Anyway, this is the equivalent of M^..M where ^-1 refers to the first parent of M.
Of course, we don’t have to limit ourselves to just the list of commits. If we wanted, you could also get a patch containing the collective changes that got merged into master by saying:
git diff M^-1
Git’s syntax might be ridiculously opaque at times, but finding out what’s in a branch is easier than ever thanks to Git’s intuitive branching model.
Was this helpful? If you like, you can find even more ways to slice and dice the history of your Git repository in my Pluralsight course Git Tips and Tricks.
-
If you’re on Windows and don’t use Bash, you can replace that with:
notepad .git\refs\heads\master. ↩ -
You don’t have to use the entire SHA-1 hash here; just enough for Git to tell which object it belongs to. For most repositories, the first 7 characters are enough to uniquely identify an object. Git calls this the abbreviated hash. ↩
-
Actually, it doesn’t take much before this happens: imagine a typical GitFlow scenario where you have multiple feature and bugfix branches running in parallel and you need to tell which commits are available in develop and which aren’t. 😰 ↩
-
I’ll tell you the answer and you’ll have to guess the question. ↩
 The material published on this blog
by
Enrico Campidoglio
The material published on this blog
by
Enrico Campidoglio
is licensed under a
Creative Commons Attribution 4.0 International License
.
© Enrico Campidoglio AB, 2008–2024 — built with Vim and Jekyll.